
I have jumped into my slide scanning project with both feet and have found that the project that I expected to be quite easy is really going to be a lot of work. I took a good look at my file library and realized that I have forty three-inch binders filled with slides. I have scanned three of the forty binders in the last month. The last binder that I finished had fifty-six slide pages. Not each page is full but at an average of 16 slides per page, that equals 896 slides in one book.
On the plus side is seeing images that I made twenty years ago. I always thought that I could remember every image that I have taken but was I wrong! I look at some of these images and go “Wow, did I really take that picture?”
Before I started this project, I used to scan one slide at a time. That led me to only scan enough slides for each subcategory to fill one page in my web site photo gallery. That was a maximum of twenty images. The rest resided in albums. When I originally scanned the slides, I wasn’t aware about the importance of IPTC information embedded in digital files. I burned all the scanned slides as TIFF files onto CD’s and did not keep a copy on my PC. Every time I needed one of the digital files, I copied it off the CD to my hard drive and used it. That meant that I would need to add all the caption and image information to the file before sending it out. It took what should have been a five-minute project and made it a 30-minute task. Earlier this year, I decided to move all the images from the CD’s to my computer and get everything captioned and labeled. I am glad that I did it as I had a few CD’s that I could not read anymore which meant rescanning the original slides.
I was talking to my son, Tom, the other day about my project. He is recovering from a traumatic brain injury and I am constantly amazed with his progress. I asked if he knew why I was going to scan all my slides. My answer to him would have been that they are not doing me any good in albums on a shelf in my office. I need to get them on the web so that they can be seen. His answer to me about my reasoning was “for ease of access to the images.” I started to correct him but when I thought about what he said, I realized that this was the most important reason. Yesterday, his assessment was tested. I needed to upload 25 high resolution files to a Dropbox account. Some of them would have been on CD’s and it would have been a lot of work to get them in the condition required for delivery. Instead, I opened up my Dropbox folder and dragged and dropped images into it. I was done with my upload in less than 30 minutes. How great is that. Before I move on, if you have not heard about Dropbox, it a site where you can get 2 GB of storage space on the cloud. All you need is a gmail account. You can use this space to back up your computer files or to share photos or files with friends. I have been using it as a backup destination for my phone data and also for sharing with friends.
Once I realized how many slides I had to scan, I sat down and developed a work flow to make things easier. Here’s how it goes. I use Vuescan to batch scan slides with a Nikon 5000ED scanner with a Nikon SF-210 slide feeder. I can scan fifty slides at a time. Since all my slides are divided into categories like Fish, Invertebrates, Rays, Turtles, Marine Mammals, etc., I do each category and subcategory separately. Subcategories of fish would be Band Sea Bass, Black Sea Bass, etc. I could scan much faster if I just put fifty slides in at a time and scanned them all into a generic folder and then separated them afterwards. I hadn’t thought of doing that until just now and I may change my workflow in that direction. One of the hassles of doing things the way that I am now is that when I have subcategories with only a few slides, it is tedious to make a new folder, scan three slides, process those three and then move on.
Okay, I batch scan all the slides in a subcategory. Each slide is scanned at 4000 dpi and at 16 bits. The scanned image file is approximate 130 mb in size and are 1.3” x 0.9” at 4000 dpi. After scanning, I rename each slide to accommodate my current labeling system, add descriptions, keywords, copyright information, etc. For this I use IMatch. I have been using this program for a long time and it is extremely flexible and powerful.

As an example shown above, I can take all my images in a subcategory and assign them to categories. I the case above, the great barracuda images in this category are assigned to “Animals” “Fishes” “Marine” Barracuda (Sphyraenidae)” “Great Barracuda” and “Sphyraena barracuda.” I also assign other categories to the images such as “Location” “Oceans” “Atlantic” “South Carolina” etc. Once I have checked off the categories that I want for the images, I run a script called “Copy IMatch categories to IPTC keywords.”
All the categories that I assigned are now keywords in each image. If all the images were taken of the same subject and the image caption is the same for all, I would open the IMatch IPTC editor and add the remainder of the information that I want:

I entered the caption information and all the other criteria (except the object name which is the image number) and press the “Close” button and IMatch adds the information to the IPTC section of each image.
Now that I have completed my labeling work, I now have to process the images. When I was scanning one image at a time, I would open each individually in Photoshop and make all my adjustments. If I did this with the approximately 25,000 slides that I have, I would be at this forever. So I came up with another plan of action. I use a filter in Photoshop named “Perfectly Clear.” I have been very pleased with the way it processes and image. I run a batch program from Adobe Bridge to process each image in a folder using the Perfectly Clear filter.
Just a heads up, since my scanning process will go on for quite awhile, I am going to be adding some of the scanned photos to my blog posts and will probably be doing posts about the images themselves.
After the images are process with the filter, I open each one individually and crop each image to 8” x 12” at 300 dpi, and do all my usual Photoshop operations like spot removal, backscatter removal, etc.
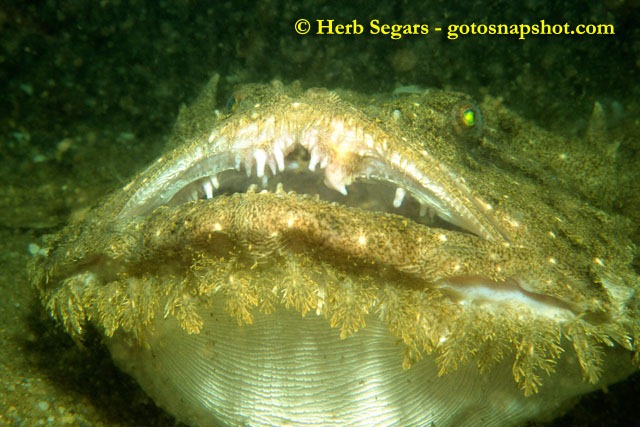
I have an incredible sequence of a monkfish eating a black sea bass. What I forgot was that there were images in that sequence that I never scanned. This is one of them. The sea bass is in the monkfish’s throat and he is swallowing it. I scanned the image before this one and the image after but not this one. It was one of my “Wow” finds.
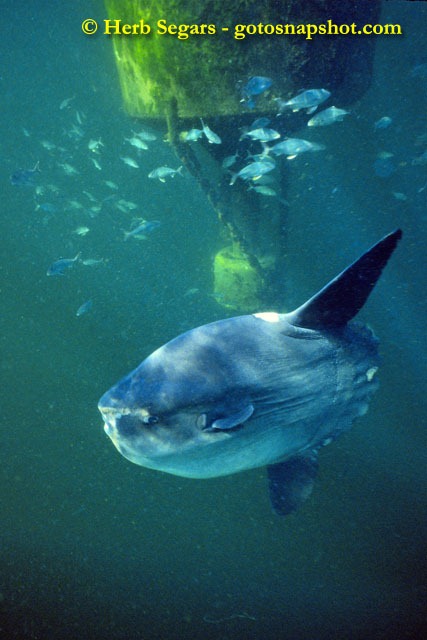
My wife, Veronica, and I would stop at the “2M” buoy about a mile outside of Manasquan Inlet. We usually stopped on an incoming tide which was when the water was the clearest around the buoy.
Other boaters would stop and ask if we were in trouble or did the person in the water need rescuing. Veronica and I would just laugh because they never realized what we could see beneath the surface.
On this day, we were blessed with the presence of an ocean sunfish (Mola mola). They are gentle giants that reach a height of ten feet from top fin tip to bottom fin tip and a weight of 2000 pounds. They feed on jellyfish so they are no threat to humans.
While I was snorkeling, Veronica had a real treat. She saw the ocean sunfish breach out of the water. I have never seen that behavior and I am really glad that she got to see it. Like many animal encounters, you just have to be in the right place at the right time. I did not realize until I started scanning how many images that I have of ocean sunfish. The crazy thing is that I have seen one in a few years. It’s not because they are not there but because I am not in the right place at the right time.
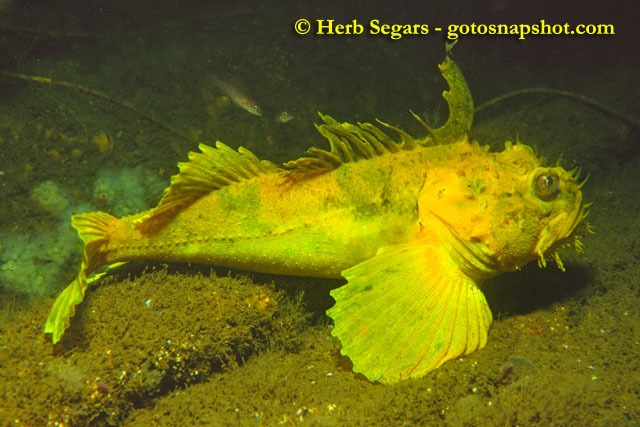
Sea Ravens are members of the scorpionfish family. They come in four colors: brown, tan, yellow and red. The brown and tan are the most common. They yellow would be the next most common and the least common is the red variety.
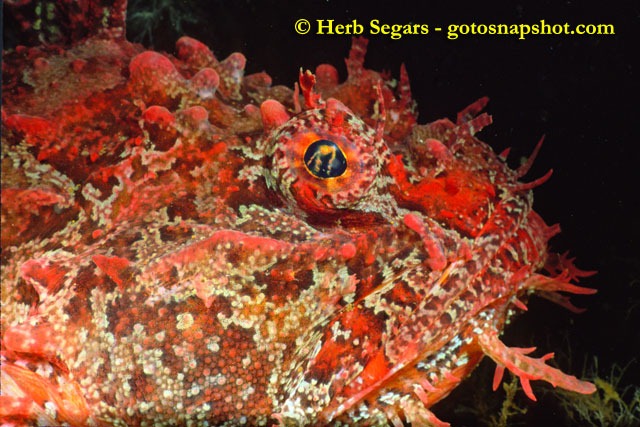
Underwater, colors are lost as you go deeper in the water column. One of the first colors lost is red. It is lost at a depth of about ten feet. This red sea raven looks very dark colored. You can see the red color by shining a light on the fish. Photographers have to use a flash to get the red color in the photograph.
Now that I have gone off on a tangent, I am going to return to my slide scanning stories. First, if you have as many slides as I do to scan, you really need to either send them out and pay to have them done or purchase a quality scanner like the Nikon 5000ED and a slide feeder like the Nikon SF210. I don’t think that I would have undertaken this task with those two pieces of equipment. The bad part to purchasing the scanner and feeder is that they are not made anymore and you have to search places like EBay to find them. Additionally, they cost more now used than they did new. My two units together with shipping cost $2800.00. New, they were just shy of $1700.00. The plus side is that when your scanning project is done, you can sell them on EBay and retrieve a good part of your purchase price back. The other two things that I am finding invaluable in this project is the Vuescan scanning software and the IMatch image database program.
That’s all for today.
© 2011, Herb Segars. All rights reserved.

All I can say is AWESOME!!