
I love digital photography and have taken thousands of photographs since I went digital. I would not want to go back to film photography. I do have to say that I have thousands of slides that I took before digital came of age. When I first started putting my web site together, I scanned twenty slides of each subject that I had so that I could put them on the site. I never thought at the time to keep the scans on my hard drive. When I completed each category, I published the images to my web site and then burned the scans onto a CD disk. I didn’t know about image information that was embedded in the file so I burned the files to disk without descriptions, key words, copyright information, etc. I had been hoping that CD’s would last for many years. Recently, I decided that it might be a good idea to move all these scans to my hard drive so that I could put in image information. Whenever I needed a high resolution photo of one of the images on a CD, I would copy the file to my computer and add the image information. If I had a tight deadline, this could be a real pain in the butt. I bit the bullet and pulled out all my CD’s. There had to be nearly 100 disks. Each disk typically had twenty files on it. As I started to copy them over, I realized that some had gone bad and I could not retrieve the files. Out of the 100 disks, there were probably six that were bad. Six doesn’t sound too terrible but with each disk having twenty files, that meant rescanning 120 photos.
So what you say? I have owned two slide scanners in my life. The first was a Polaroid Sprintscan 4000. It was a great scanner but one day, it died. My second and current scanner is a Nikon Coolscan V ED. It is also a great scanner but scanning slides is like watching grass grow. It is slow and tedious. I initially used the software that came with the Polaroid scanner to scan and then later used Nikon’s scanning software. They were both okay but I kept looking for a better option. I thought that I found it with Lasersoft’s Silverfast scanning software. I used it as a stand alone program and as a plugin for Photoshop. Truth be told, I always struggled with the software but I kept at it and was able to get some good scans. The problem was that each slide took about ten minutes to scan and process in Photoshop. At six slides an hour, my 120 slides would take 20 hours to scan. If that isn’t bad enough, I have thousands more slides to scan from my slide library.
I have looked over the years for other slide scanning software. There was one in particular that received rave reviews but I could never seem to get it to work to my satisfaction. The software is VueScan by Ed Hamrick. I saw some really great advantages to the program and I really wanted to make it work. The first advantage is cost. Silverfast is expensive and it only works with one scanner so if you have a flatbed scanner and a slide scanner, you will need a separate license for each. The current price for Silverfast 8 is $49.00 for the light version, $119.00 for the plus version and $299.00 for Silverfast 8 Studio. I am not going to explain the differences in each version. I currently own version 6 of the Silverfast 8 Studio (there is no version 7) but I will have to pay for an upgrade if I want to own version 8.
I decided to give VueScan another try. My biggest problem with the software is that I found it confusing to set up. I downloaded the software and did some googling to find out how to use it. Before I explain the program, here are some reasons for my going in this direction. The software comes in two versions, standard for $49.00 and one year of free upgrades or the professional version for $79.00 with free lifetime upgrades. It also supports 1750 different scanners so you don’t need a separate license for each scanner and if you ever change scanners, you can still use VueScan with the new software. Another plus for owners of Silverfast software is that you can purchase the standard version of VueScan for $49.00 and then send Ed Hamrick (owner and developer of the program) and email with a scan of your Silverfast serial number (in my case, the latest version was a download so I sent him a copy of the confirming email) and a statement saying that you would not purchase version 8 of Silverfast and he will send you a free upgrade to the professional version of VueScan. I decided that if I could get the program to work to my satisfaction, I would move in that direction.
First, VueScan is a stand alone program and not a plugin for Photoshop. I thought that this might slow down my processing time but I was wrong. You can set VueScan to open the scanned image in Photoshop as soon as you hit the “Save” icon.
Let’s start. Before scanning, it is important to set up the program for your needs. I am going to explain how mine is setup for scanning with my Nikon Coolscan V ED (LS-50). When the program opens, there are tabs for different menus.


The first tab is marked “Input.” I set the first dropdown to “Scan to file” as that is what I intended to do. There are other choices like “Copy” which will turn your scanner into a copy machine or “Scan to Print” which will print your scanned file.
The source is set for my scanner. The media is slide film and the scan resolution is the highest for my scanner at 4000 dpi.
“Rotation” should be kept at “Right” since it’s easier to rotate an image in Photoshop while processing it. My scanner will autofocus (not every scanner can) so I set it to autofocus “Always.”
The next choice really helped me speed things along. “Auto scan” set to “Scan” or “Preview” will automatically start scanning your slide as soon as the scanner is ready. You don’t have to push the “Preview” or “Scan” button for each new slide.
I don’t use “Auto save” but it will ask you to put in a slide name for each image that is scanned.
I chose “Scan from preview” so that the preview and scan were done at the same time rather than in two separate operations. Changes can be made to the scan before saving the file. Each menu has a button at the bottom for “More” settings. In the beginning you don’t have to worry about this but here is what you will see in the “Input” tab after selection “More.”
There are the other options available but none are necessary until you understand how the software works.
Next we have the “Crop” tab.

The crop tab dictates the boundaries of the image are. I set mine to “Auto” which worked pretty well.
You will have the opportunity to adjust the boundaries after scanning.
I left the “Preview area” at “Current.”

The “Filter” tab has a few options.
I chose “Infrared clean” of “Light.” This options cleans dust and scratches from images. This option does not work when scanning prints.
I also chose “Restore colors” which helps bring back colors in older slides. I don’t use “Restore fading” and I do all my sharpening in “Photoshop.”

The “Color” tab has a lot of choices and some can be very important. “Color balance” should be set at “White balance” or “Neutral.” Don’t use “Auto levels” as it doesn’t seem to work well with my slides. Use “Neutral” when your photo has a color cast like green water in an underwater image or a sunset photo. When you use “Neutral, go the “Input” tab and change “Media type” to “Image.” The next three settings are ones that you don’t have to do anything with until you get more proficient with the program.
Download the manual that I linked to above and read it. It is only 52 pages long but it explains all of the settings. You can set the film type (if yours is available) in the dropdown menu or if not, leave it as “Generic.”
“Slide brand” for color slides is “Color” and “Slide type” is “Slide.” I profiled my scanner with an IT8 transparency so my “Scanner color space” is set to “ICC Profile.” The next two boxes show the scanner profile name and the location of the IT8 target file. If you don’t profile your scanner, set the “Scanner color space” to “Built-in.”
“Printer color space” is set to “sRGB” as most printers use that color space. “Film color space” is set to “Built-in” and both “Output color space” and “Monitor color space” are set to “Adobe RGB” which is the color space that I work in.
Just an additional point, if you want to reset your choices to the default setting, check the “Default options” box. Remember that checking the box will cause the loss of your current choices.

The “Output” tab allows you to set the “Default folder” where images will be stored.
I set the “Printed size” to “Scan size” but you can set it to 5” x 7” or 8” x 12.” This doesn’t affect the size of the file.
I chose not to use “Auto file name” and chose “Tiff file” because that is the type of file that I use for processed images.
The “Tiff file name” has the name of the current image. If you are going to use the “Infrared clean” option in the “Filter” tab, you need to use the “64 bit RGBI” option.
The three boxes in red are optional. I do not use them but I filled in information so that you could see how to use them.

The last tab is the “Prefs” tab. You can set “Language”, “Font size”, “Crop units” and “Printed units.” The “External viewer” check box will open your saved scan in the editing software of your choice. I have my Windows 7 computer setup to open Tiff files in Photoshop CS5.
The “External editor” check box will open up the text editor of your choice if you are doing OCR (optical character recognition) of a scanned document.

Now that everything is set, it is time to click on the “Preview” button to see our first slide. Since I chose “Auto scan”, I don’t have to click on the preview button. The image will scan as soon as the scanner is ready.

Once the image is on screen and in the “Preview” tab, I can adjust my outside borders by moving each border separately. There are plenty of times when no adjustments were needed.
You can click on the “Scan” tab to see what the scanned image looks like. With the “Preview” set to high resolution, they look the same except for the border lines which won’t show in the “Scan” tab:

All that’s left to do is hit the “Save” button and the image will open up in your photo editing software.

You can set the white and black points on your image using the black/white graph. It is found by clicking the “Image” menu in the top menu and selection “b/w graph.”
Here is what mine looked like while scanning, after scanning and after making a change to the white point:
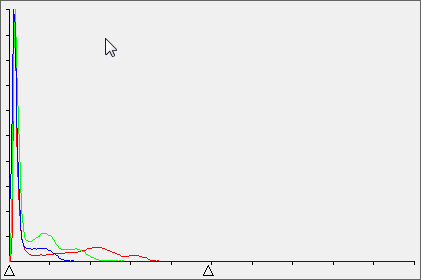
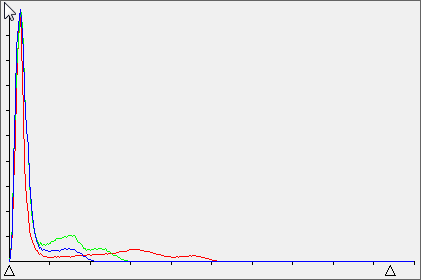
The white point is the left hand triangle and the black point is the right hand triangle. These are not be be confused with the histogram of the image.

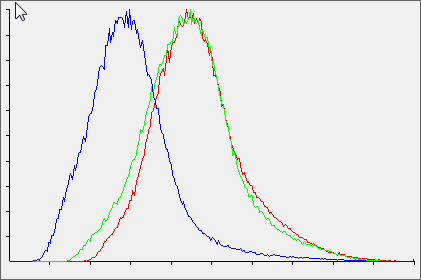
In the left hand image above, I moved the white point to the right to balance the image. The right hand image shows the histogram for the same image.
I have been extremely pleased with the results that I have achieved using VueScan. I find it works rather fast and that the scans have very good quality. I took Ed up on his offer on a free upgrade to the professional version of VueScan. I was happy to provide the statement that I would not be purchasing verion 8 of Silverfast. I am now a VueScan convert.
My suggestion before starting to use VueScan is to download the manual that I linked to at the beginning of this blog or go to the VueScan website and read through their tutorials. If you get hooked on VueScan, you might want to buy the VueScan Bible by Sasha Steinhoff from Amazon Books. Click on the image below.

© 2011 – 2017, Herb Segars. All rights reserved.

Thanks for this comprehensive tutorial. I own a Nikon scanner and VueScan software and I was in big trouble, now I know how. Hello Antonello (Tuscany – Italy)