
|
I recently read an article in the Divers Alert Network’s members magazine written by a great photographer named Eddie Tapp about removing backscatter from an underwater image using Photoshop. I gave it a try and was really impressed so I am gong to show you how it works. Backscatter is a problem for underwater photographers. It happens when light from an underwater flash is lit up and shows in the image as white dots. Although most of us work hard to try and eliminate backscatter, sometimes it’s just there. |
|
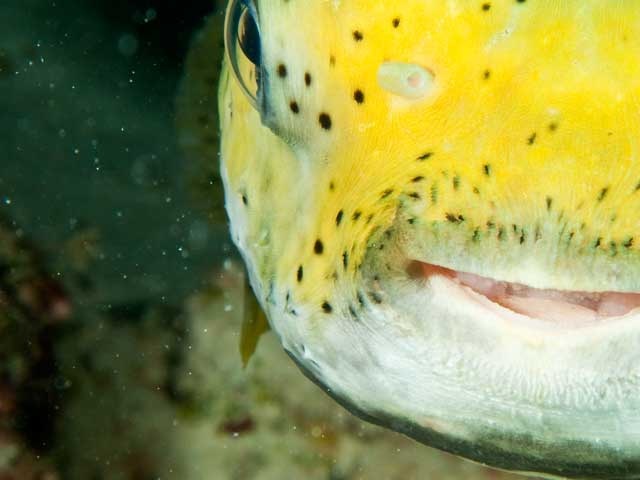
 This photo is a favorite of mine. It is a porcupinefish photographed in the Bahamas. This was one cooperative fish and it let me get up close and personal. I think that it saw its reflection in the housing port and was curious. It’s not easy to tell in the picture above but there is a lot of backscatter. This photo is a favorite of mine. It is a porcupinefish photographed in the Bahamas. This was one cooperative fish and it let me get up close and personal. I think that it saw its reflection in the housing port and was curious. It’s not easy to tell in the picture above but there is a lot of backscatter. |
|
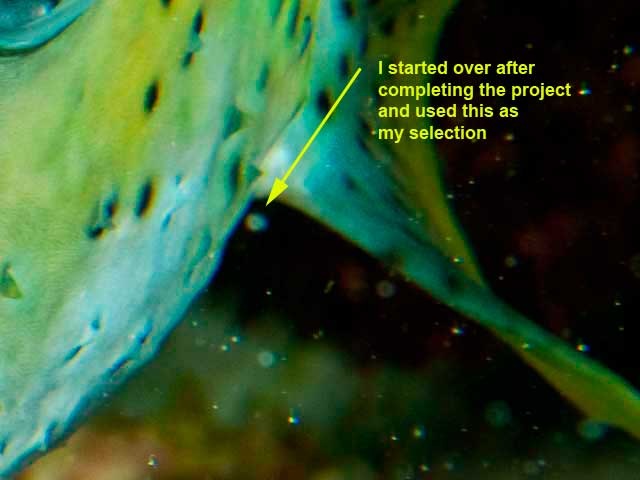
 I cropped a portion of the photo so that the backscatter would be more evident. I cropped a portion of the photo so that the backscatter would be more evident. |
|
|
|
With the photo open in Photoshop (I am using CS4 here), choose “View” from the top menu and then choose “Actual Pixels”. This will give you a 100% view of image. When you first open an image in Photoshop, you are looking at a image resolution of approximately 25% to 30%. You can also accomplish the same thing by taking your mouse and double clicking on the “Magnifying Glass” icon on your toolbar palette. Zooming into a 100% view allows you to see the backscatter in the image and makes the next part of our work easier. |
I choose to use the other side of the image to do my work so I held down the space bar which changes the cursor into a little hand and while holding the spacebar down, I moved to the other side of the image. I made some notes on the image below. You will be choosing a backscatter element to work with a little later. I wanted you to see the one that I chose. |
|

Next, you should have the “History” panel showing on the screen. If it is not, choose “Window” from the top menu and click on the “History” choice. It will open a panel like the one on the left. |
 Now choose “Filter” from the top menu and then choose “Noise” and “Dust and Scratches”. Now choose “Filter” from the top menu and then choose “Noise” and “Dust and Scratches”. |
|
You will get the box shown on the right. First, move both sliders all the way to the left. You will have the same values that you see here. Take your mouse and click on one of the backscatter items. Try to choose a size that is consistent with the backscatter in the image. Don’t choose too large of a backscatter item. In my photo, I have a lot of white dots that were fairly similar in size. |
|
 |
First, slide the “Radius” slider to the right until you see the white backscatter item disappear. You can use the up and down arrows on the keyboard to control this easier that using your mouse on the slider. After you have reached a point that looked good, increase the radius slider by one or two pixels. I found that a radius of six looked good and I then increased it to eight. I found the next part more difficult. When you apply the radius to the photo, it blurs the entire photo and that is okay because we want that. When the photo is blurred, you remove the grain from the photo. We need that grain to achieve our objective. If you use your mouse and click in the preview box, you will see the unfiltered image. Slide the “Threshold” slider to the right and keep checking the preview box until you get the same amount of grain the filtered selection as you have in the unfiltered selection. My eyes are getting old so I found this a little difficult. Eddie Tap notes that the “Threshold” setting will be between half and twice the “Radius” setting. In my case, it would have been somewhere between 4 and 16. I decided that 8 looked good to me and went with it. Once you are satisfied with your choices, click on the “OK” button. |
|
At the bottom of the “History” panel, there is an icon that looks like a camera. It is the “Snapshot” button. We will need a snapshot of the image as it is now to use later. Click on the “Snapshot” button. |
|
|
Once the button is clicked, you will see will see an image under the original in the “History” panel that is named “Snapshot 1”. You will see an icon to the left of the original image that looks like a paintbrush with a counterclockwise arrow. That is for the “History” brush. Take your mouse and click in the box to the left of “Snapshot 1”. You will see the “History” brush icon move to the “Snapshot 1” image. Take your mouse and click on “Open” box just below the “Snapshot 1” image. You will see your original image back on the screen. |
|
|
|
Click on the “History Brush Tool” icon in your “Tools” palette and hold the mouse button down to make sure that the “History Brush Tool” is selected. Your next choice is to choose the size of the brush that you use. You can use larger brushes with soft edges for larger areas and smaller brushes with hard edges when you get in close to your subject. You can make brushes larger and smaller using the brackets keys [ ] on your keyboard. The left one makes the brush smaller and right makes it larger.
|
|
Use the brushes palette to choose the type of brush that you want to use. |
|
 Before you start with the brush, go to the top of your screen and in the “Mode” dropdown, chose “Darken”. Opacity and flow can be left at 100%. Before you start with the brush, go to the top of your screen and in the “Mode” dropdown, chose “Darken”. Opacity and flow can be left at 100%. |
|
 I used the “History Brush Tool” on this section of the image and you can see that the backscatter is gone. There were some things that were difficult to remove so I used the “Healing” tool and the “Clone” tool to clean those areas up. Below you can see the original portion of the image with the backscatter. I used the “History Brush Tool” on this section of the image and you can see that the backscatter is gone. There were some things that were difficult to remove so I used the “Healing” tool and the “Clone” tool to clean those areas up. Below you can see the original portion of the image with the backscatter. |
|
 |
|

Here is the finished image. It looks so much better than it did before. It may take some time for you to be successful with this operation but it’s well worth the effort. Thank you, Eddie Tapp. One note of caution. Do not crop or rotate your image while you are doing this procedure. It is important that the original image and the “Snapshot 1” image stay the same for this to work properly. Either rotate and crop before or after eliminating backscatter. |
|
After I finished working on the image, I opened the original image again and tried a larger selection to see how it work. I found that I needed a “Radius” of 25 pixels to make it disappear. I initially tried a “Threshold” of 25 but found as I brushed that I got some sharp ugly edges around some of the backscatter elements. I lowered the “Threshold” to 14 and it worked much better. I found using the larger backscatter element made cleaning up the image easier. The end result looked the same as the one above. |
|
|
By the way, I looked to see if you could do the same thing in Photoshop Elements. I looked at PSE 7 but I found that there is no “History Brush Tool”. I googled to see if I could find a work around and there seems to be a way to do it but it looked like it might be pretty difficult. If anyone knows how this could be done in Photoshop Elements, please post here. |
|


© 2010, Herb Segars. All rights reserved.
