For years, I have been using an Adobe Photoshop action to watermark the images that I place on my web site or on Facebook. I modified it at one point so that my friend, Robin Reed, could use it for the same purposes. The other day, I wanted to make some changes to it and realized that I really couldn’t figure out how I made the initial action. The action resized my photos to either 640 in the vertical or horizontal direction (depending on the photo orientation – landscape or portrait), added my copyright information in one of the four corners of the photo that I chose (separate actions for each corner) and then saves the photos in a folder of my choosing. I have to admit that I did not invent the action, I learned about it on a web site but for the life of me, I couldn’t remember where. So I did some internet searches to see if I could find the action and I couldn’t but I found something even better and the great thing is that my new find was created by the same person that created the initial action, Russell Brown. Russell Brown is a senior creative director at Adobe Systems and a amazing Photoshop guru.
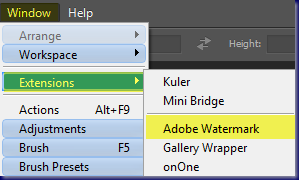
I will explain to you how this gem works but it may be easier to watch the video on the Photoshop World Tutorials by Russell Brown page. You can also download the panel on the same page. It works with PC’s and Mac’s and there are installation instructions included. The application is a panel that is loaded using the Adobe Photoshop Extension Manager. Once loaded, open Photoshop and click on “Window”, “Extensions”, “Adobe Watermark Panel.”
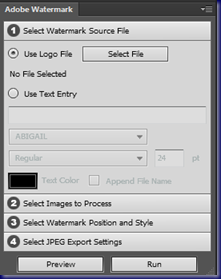
The following panel will open:
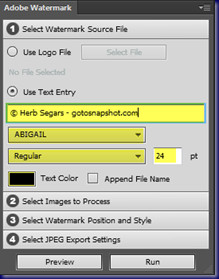
There are four steps to run this panel. The first step is to choose the Watermark Source File. You can use a logo file or you can use text. Once you enter the text, you can choose the font, whether it is bold or italic and the size of the font as well as the color of the font.
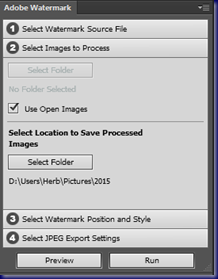
In step two, you choose the images to process. You can either select a folder of images or use an image that is open in Photoshop. You also select the location of the save image or images.
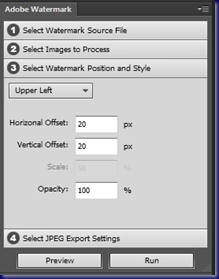
In step three, select the location of the watermark. There are many choices including center, center top, center bottom, center left, center right, upper left and right and lower left and right. You can choose the horizontal and vertical offsets and the opacity of the watermark.
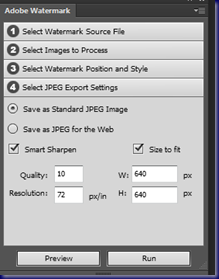
Finally in step four, you select whether the jpeg is saved as a standard jpeg, preserving all metadata, or as a jpeg for the web where only essential metadata is stored. A jpeg for the web creates a smaller file. There are also choices for smart sharpening the jpeg, the resolution of the image (72 px/in) is standard for web images and the size to fit. By putting the same size in the width and height boxes, both horizontal and vertical images will be resized correctly according to their orientation.
Best of all is the left button at the bottom of the panel – the button marked “Preview.” This will run the action on the open image and provide a preview of what the final result will look like.
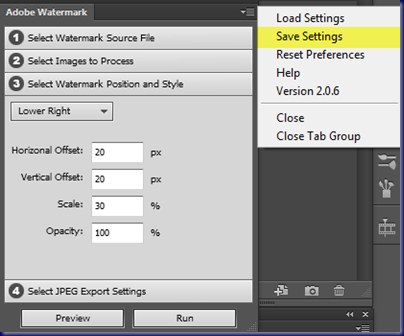
The photo on the left is a full-sized tiff and the one on the right has my logo in the lower left-hand corner and photo resized to 640 pixels in the vertical dimension. The great things about this panel don’t end here. Once you have a setup that you like, you click on the down arrow in the upper right corner of the box and save your setup for future use. I named the one with the logo – “Web Logo Watermark.”
You can save the settings for any watermark that you create. I made a folder named “Photoshop Watermark Settings” in the My Documents folder and save the setting there.
I also wanted the same setting for Facebook photos which I save at 1600 pixels on the long side of the image. I changed the “Size to Fit” settings to H: 1600 and W:1600 and then saved the settings as “Facebook Logo Watermark.”
I could do the same thing using a text watermark.
I saved this as “Web Text Watermark.” I also changed the size preferences to “1600” and saved it as “Facebook Text Watermark.” There are so many more creative ways to use this panel. I have just started using it and I am really loving it.
If you haven’t watched the video about using the Adobe Watermark Panel, you should. It is definitely worth watching. See it here.
My last comment is that I would like to thank Russell Brown for this wonderful Photoshop panel. It sure has made my life a whole lot easier.
© 2015, Herb Segars. All rights reserved.

