I have owned a Subal ND20 housing for my Nikon D200 for a few years and I really like it. It has an enhanced viewfinder which is great for my old eyes. When the Nikon D300 was introduced, it appeared to be about the same size as the D200 and I was hoping that it would fit in the same housing. It turns out that it will fit but all the buttons are not in the same place as those on the D200. It will not fit without some modification. I had hoped that Subal would come out with a new housing back plate and camera base plate to allow the D300 to be used in the housing. I am still waiting for that and it doesn’t appear that it is going to happen. Fortunately, I was visiting the forums on wetpixel.com and I found a thread about a fellow from Korea that was making an adapter kit to allow the D300 to be mounted in the D200 housing. I contacted him immediately. It took a little while to obtain the parts as Sam Shae only makes them in lots of 10 and he has to have orders for 10 before he will have another batch made.
I received the kit and it contained a new camera base plate, five interior button extensions, a new rubber wheel for the “Single, Continuous” adjustment dial and some wire clips to act as spacers below a few of the interior button extensions.
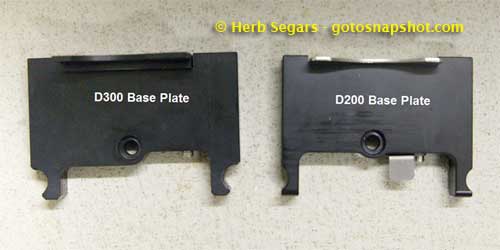
The new base plate comes without the bolt to attach the base to the bottom of the camera or the locking swing plate that locks the camera into the housing. Both need to be removed from the D200 base plate and added to the D300 base plate.
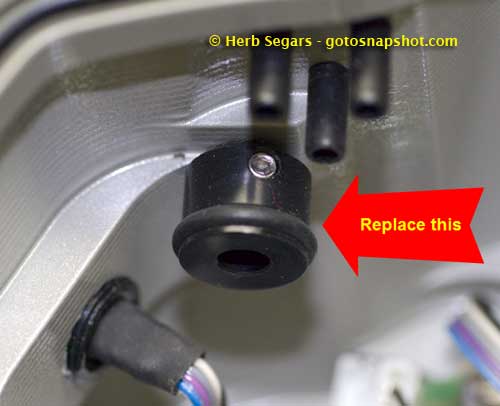
The control wheel at the top left on the inside of the housing has to be replaced as the camera body will hit it and it will not fit into the housing. This is the D200 control wheel.
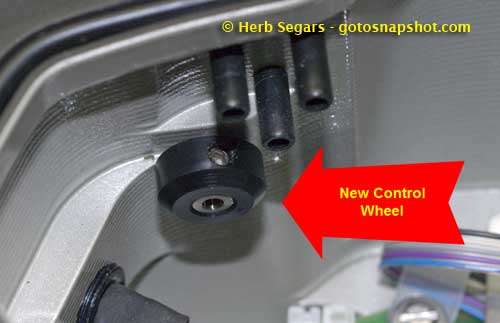
 I installed the new control wheel but I was never able to get it to work. I am not sure what I am doing wrong but it really isn’t a problem because I have never used this control while shooting underwater. Now it was time to tackle the rest of the inserts. Everything else is done on the housing back plate.
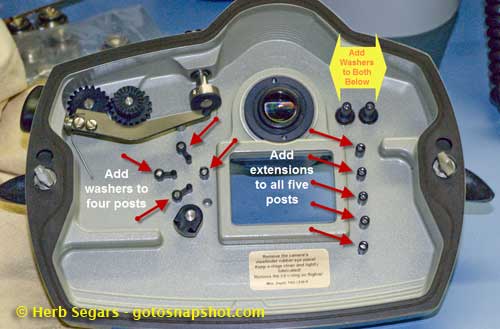
The five extensions for the buttons to the right of the LCD viewing window on the housing push onto the existing extensions and flat washers need to be put onto the two extensions on the upper right hand side of the housing and to the four button extensions on the left side of the LCD viewing window. The extensions are easy to install, they just fit over the existing posts. The washers proved a little trickier for me. I used nylon metric washers (size M3) which have a thickness of .8 mm (.032″). I will try and explain how I put them on. Using a very small flat-tipped screwdriver, I unscrewed each post and took them out of the housing. I would then push the button in from the outside of the back plate, put a washer over the inside post, put the extension back on while still holding the button in, put the screw back into the center of the extension and turn it a few turns. I then let go of the button and pushed on the screw. When I looked at the button on the outside of the housing, I saw that it was sticking out farther than usual. That was because I had not fully tightened the screw. I started to tighten the screw and watched the button on the outside. When the leading edge of the button was even with the recess in the housing, I stopped tightening the screw. This worked and every button functioned. I will probably think about putting some locktite on the threads.
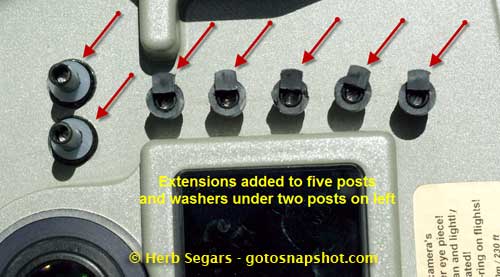
The new extensions are positioned so that the little top tab points towards the right when you are looking at the inside of the back plate. One washer is under each of the two top extensions (seen here on the left side of the photo).
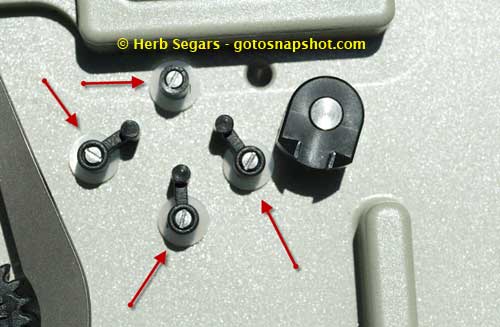
 The flat washers are added to the four push buttons to the left of the LCD window.
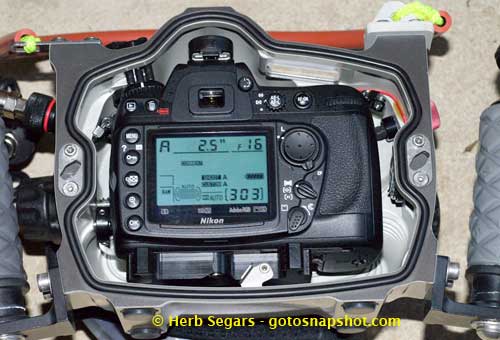
The D300 is shown installed into the Subal D200 housing. I am able to get at all the controls except for the center of the control button just to the right top of the LCD screen. This is not really any problem at all. I also cannot get to the flash exposure compensation button. Neither control was available on the D200 housing so there is no way to access them. Some of the controls are different. The “Playback” button is on the top left hand side of the housing and the “Menu” button is now at the top of the five buttons on the left side of the camera. It will just take some getting used to. I have to admit that the D300 has given me a feature that I think that I will really love. I have problems sometimes seeing the camera settings that I am using, especially when diving in New Jersey where the light levels are low. The second button from the top in the five buttons to the left of the LCD screen does this:
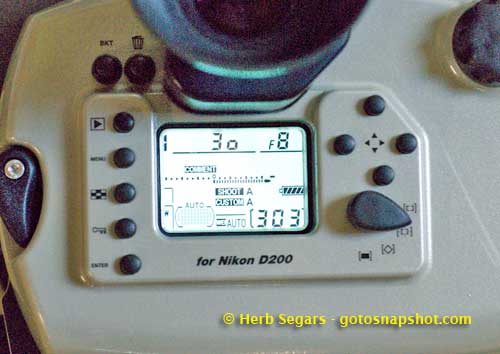
Pushing the button shows the current setting for the camera. I can make adjustments and see them very clealy in the LCD. It is much easier than trying to see them in the viewfinder or through the top LCD. Another minor annoyance with using the D300 in the D200 housing is that the D300 has a larger LCD screen than the D200 and part of it is cut off in the LCD window. I can see what I need to see well enough that I do not believe that it will be an issue. By the way, the third button down in the five button group magnifies the image on the LCD screen. It will be a great way to check sharpness. Now I need to try this setup. I hope to do that soon and I will report on my findings. If you are interested in contacting Sam Shchae for this kit, you will have to do it through wetpixel.com. Here is a link to the thread about the kit. You will have to register on wetpixel to send a member a message but sign up is free. You can send a PM to Sam about your interest. Look for his replies in the thread and there is a button to send him a PM. Don’t be upset if it takes a little while for him to answer you. He is often traveling on business and that slows down the communication process. I seem to remember that the kit cost about $150.00 USD plus shipping from Korea (less than $20.00). I was able to pay Sam using PayPal and I received the package much quicker than I expected.
I did notice something when I tried out the dual Ikelite Ds-125 strobes that I normally use. I have an Ikelite TTL adapter to allow TTL flash with the Nikon and the Ikelite strobes. I normally shoot in “Aperture” priority where I set the lens opening and the camera picks the shutter speed. When I am shooting close, it doesn’t really do much because all the light comes from the strobes. The shutter speed is normally around 1/60th of a second. This occurs as soon as the strobes are turned on and ready to fire. When I turned the Ikelite adapter from “TTL” to “Manual”, the D300 went into Aperture priority mode like there were no strobes attached. It gave longer shutter speeds in low light but the strobes still fired when I took a picture. This might be interesting underwater. In any case, if you are using the Ikelite adapter in “TTL”, you should get normal shutter speeds when the strobes are turned on and if you have the adapter in “Manual” mode, you might want to change the camera mode to manual to be able to adjust both aperture and shutter speed.
© 2008, Herb Segars. All rights reserved.


HAve you tried underwater a D300 in ND 20 using sams conversion kit
I haven\’t been able to try out the D300 modification yet. I hoped to get out before my boat came out of the water here in New Jersey but it didn\’t happen as the last few weekends have had poor weather. I will be trying it out at Christmas when I head to Florida to photograph manatees. I really think that it will work well.
Hi Herb, how was the christmas diving with the new kit? Have you tried it out yet? Been thinking on buying the upgrade myself too, so if you could add a few words on wether it worked out for you would be much appreciated, thanks…
I am back from my Christmas trip with the manatees and used the D300 in the D200 housing and was extremely pleased with the results. Everything worked as it should and I was able to access all the controls that I need to access. I will be posting a report on the manatee trip in my blog and it will have photos taken with the the new setup. I will also be putting new manatee photos in my Photo Gallery that were taken with the D200/D300 setup. Considering that Subal wants $2300 USD to modify the D200 housing for the D300 and Sam’s kit cost $150 USD, it is one of the best bargains that I have ever gotten in underwater photography equipment.
Hi Herb,
it is with a great interest, that I read this article. I just bought a Subal Miniflex-MD, made for a Minolta 7000I or 8000I. This means that it is about 20 years old, and my Sony alpha 200 does not fit without problems…..
When looking at how this Subal “first generation” Miniflex is made, I gues I have an idea of how to make new controls/knobs on a house. If you need/want the center of the control wheel I gues that you can drill a hole and make an insert of stainles with a tread, and a knob. That is how they made all the controls in my old house. In this house all functions on the camera body is made by turning/twisting a knob. No push kontacts. If you get a craftsman to make a knob like the ones on your housing you could make a tread so it will fit properly. In that way it is also possible to adjust the depth in the housing when screwed in place. If you use some sort of locking fluid like “Locktite” it will be watertight to ;o)
The diameter of the original stainless inserts looks like some sort of 10mm fine tread. If interested I can measure the correct size. Axle/pin diameter looks like 5mm.
Could yoy help with a photo and a decription of the how the push buttons are made? It wil make it easier to convert my old Subal.
Flemming
thks man for the info
can I change nexus housing d200 to d700
thks
Hi Herb,
Thanks for this article – very useful.
I’ve had my D300 in my D200 housing for just under a year, and have been very pleased with the benefits of the low-light handling and more focal-points.
When it came to fitting, I had a couple of experiences I thought I’d share:
When fitting the M8 plastic washers, after the first couple, I just cut the plastic washers and then split and pushed them in to place.
I had problems with the buttons on the left-hand-side (looking at the back of the camera/housing) – they wouldn’t move, and I couldn’t initially figure out why. I eventually worked out that for some reason on my set-up the original buttons – not the extensions – were blocked by the body of the camera itself. I resorted to trimming down the original button-posts by about a millimetre using (of all things!) a nail-clipper! However, I wouldn’t recommend this unless you’re having the same problem.
Cheers!
Mark Atwell – damphotos.com