I have a Toyota Land Cruiser. It is my second one and I really love it. Unfortunately, in this day of high fuel prices, I wish that it was much better in fuel economy. I know that whatever I buy next will get better gas mileage. For now, the resale value on it is bad so I am going to keep for awhile longer. One of the things that I hate about the vehicle is having to click on the “I Agree” notice that comes up on the navigation screen everytime that I start the truck. I also dislike the fact that I can’t use the built-in blue tooth to dial out while the truck is moving or that I cannot add an address to the GPS Navigation system while the truck is moving. Normally, I would not do this while the truck is moving but if I am traveling with my wife, she would punch in the information. A few years ago, I saw a device manufactured by CoastalETech called the Ultimate Lockpick. Since I am going to keep the Land Cruiser for a few more years, I decided to buy one of these things and install it.
CoastalETech says on their web site that their device bypasses the “I Agree” annoyance, allows on screen dialing of a number for the blue tooth phone system, entering addresses into the GPS Navigation system unlocking the DVD system so that movies could be watched while the truck is moving. The last three items can be done while the truck is moving. This is not possible now.
I was happy to see the kit arrive by UPS but as I started reading the instructions, I found that there were no real instructions on how to install it. They recommended that a competent installer install it for me. I am a little mechanically inclined so I though that I could do it. I started searching on line for instructions and found some but eventually found out that they didn’t apply to my particular year and model.
With Veronica’s help, I started on the project with the limited instructions that I had. We fumbled around for about fifteen minutes and then I went googling again for more help. Thinking that I found better instructions, we started again and still could not figure out how to do this. The diagram that I found on line showed a different layout than I had in my truck. Well, thanks to Veronica’s sharp eyes, we figured it out and I am going to show you how to do it with this particular model. I am sure that it may apply to some newer models as well.
First, you are going to need a small flat-tipped screw driver or a thin putty knife.

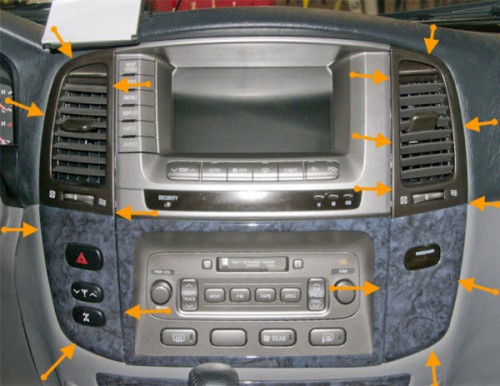
We started at the bottom on the left side. Do not pry on the plastic overlays as they are glued onto the piece that needs to be pried out. I pushed in the flat-tipped screwdriver and started to pry out very carefully. There is a clip in the bottom right corner of the left hand area and also one in the bottom left corner of the right hand piece. The area within the arrows above comes out as one piece. The vents are attached to the lower section. When you pull out each section, it is attached with wires to the radio. We did not disconnect anything but just laid them down on the center console.

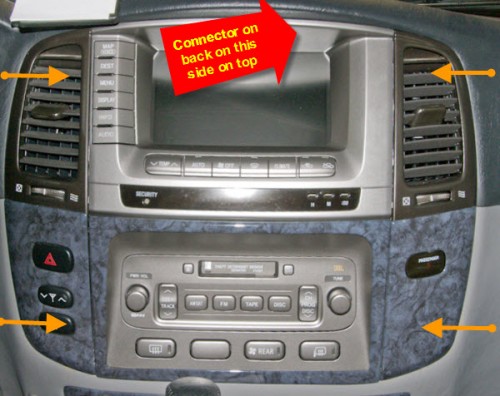
Once the panels are removed (I am sorry that I didn’t photograph how things looked with the panels removed but I wasn’t going to take everything apart to do that), There are four screws that can be taken out with either a Phillips head screwdriver or a hex head socket wrench. I opted for the Phillips head screw driver. Once the screws are out, the radio and nav screen come out as a unit. There are a number of plugs on the back of the unit and I didn’t know which was the correct one and there wasn’t any information in the instructions. I started pulling out one plug at a time until I found the one that had the same connectors as the one supplied by CoastalETech. If you are facing the nav screen, it is the top plug on the right hand side. Simply disconnect the plug from the unit. There is a little center tab on the plug that has to be depressed to allow the plug to come out. Once it is out, plug the CoastalETech Ultimate Lockpin into the back of the unit (female connector on unit to male CoastalETech connector) and then plug the plug that was originally connected to the unit into the female connector on the CoastETech unit.
We put the nav screen / radio back into the dash, installed the four screws, popped both side pieces into place and turned on the ignition. The “I Agree” sign came up and after a few seconds disappeared. It appears that our installation was a success. I haven’t tried any of the other features yet but I am sure that they will work just fine.
If you have any questions about doing this, either post them here on the blog or send me an e-mail. Now that this is done, I wish that I had done it a few years ago after I bought the truck.
© 2008, Herb Segars. All rights reserved.

