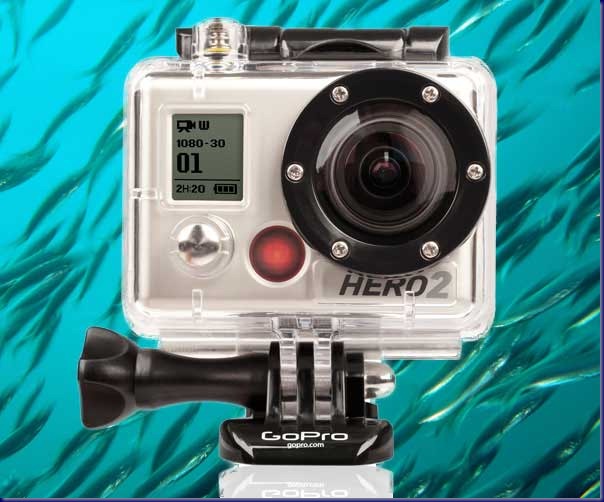
I have been waiting for Nikon to produce an upgraded camera body to replace my D300. There are two things that I would like to see in a new model. First, less high ISO noise. With the low light levels off New Jersey, I often have to shoot at 800 ISO or higher and I can see noise in the higher ISOs. Secondly, it would be nice to be able to shoot video with my DSLR. The D300 does not have that capability. It seems like I have been waiting for Nikon forever and nothing happens. I have seen a number of New Jersey scuba divers using the GoPro video camera and the results look very good. I decided to bite the bullet and buy one. I realized after I made my purchase that there were plenty of other items needed that added to the bottom line. I ordered the GoPro Hero2 HD from B & H Photo and Video in New York City as I had some gift cards from past birthdays. The cost of the camera with housing was $299.00. My end goal was to mount the camera to my DSLR housing and then have the capability of shooting stills and videos on the same dive.
I was really impressed with the small size of the camera and the quality of it’s video. After I received it, I started my research about the GoPro Hero2. The first glitch that came up is that the housing that comes with the camera is terrible underwater. I was flabbergasted. Why make a housing if it doesn’t work well underwater? It turns out that the housing has a domed port to match the curve of the video camera lens. In theory that should work but it doesn’t. To make the camera shine underwater, a flat port is necessary. Until recently, choices included buying a separate housing from Backscatter, BlurFix, EyeofMine, or a lens replacement from Mako. The prices of the housing vary from $49.00 to more than $139.00. The lens replacement from Mako is $21.00 and is a do-it-yourself project.
Recently, GoPro has added their own housing with a flat port. I sure would have liked to see it as part of the housing package but so far, it is not. Their housing with flat port costs $49.00.
I decided to purchase a new housing from Backscatter. One of the reasons was the introduction of a flip up Magic-Filter that could be mounted to the housing. The housing was $119.00. So my total for the system is $418.00. I also thought that I needed a way to mount the camera to my housing so I bought a tripod mount for about $8.00. I am not up to $426.00.
Doing more research, I found a ball mount for the bottom of the GoPro housing made by Ultralight Systems. The ball mount is the same style that I use for my underwater strobe arms.
That set me back an additional $39.00. The total is now $465 and I am not quite done. I needed a memory card since the GoPro does not come with one. I ordered a 32GB card from NewEgg. The card cost $38.75 with free shipping. GoPro offers an LCD back for their camera with an extended housing back to accommodate the LCD back. I felt that this would be a good addition to the system. Cost: $99.00. The grand total is $602.75 and I was pretty much done as the few other things that I needed, I already had. They were a ball mount for the top of my housing and a clamp between the two ball heads.
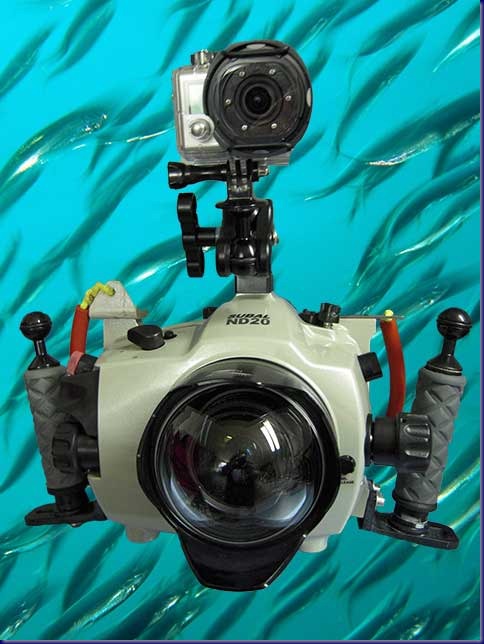
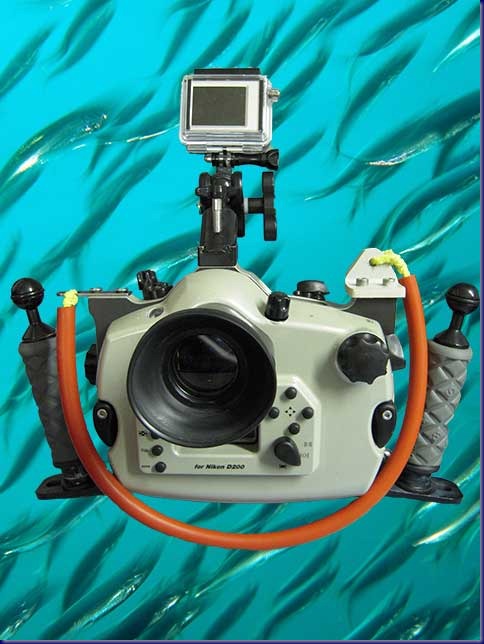
The next part of my project was to mount the GoPro to the top of my Subal housing. I have a mounting hole on top of the housing and I secured a 1” diameter ball head to the housing and installed the Ultralight Control Systems GoPro ball adaptor to the GoPro housing and used a clamp to connect the two balls.
This is a front view of the Subal housing with the camera mounted on top. The clamp allows me to move the video housing to suit my needs. The camera is so small and light that it’s like it’s not there.
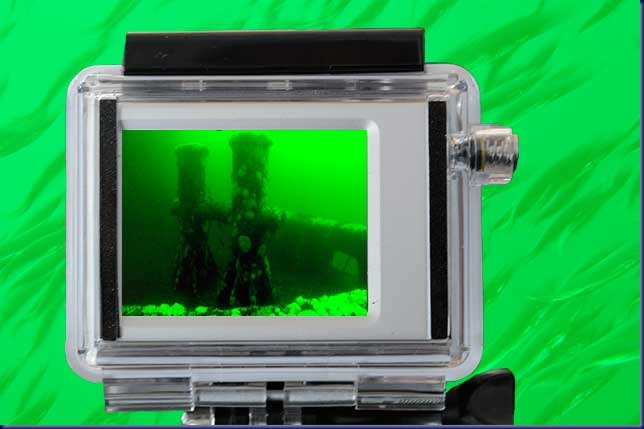
I shot my first underwater video with the system while making a dive on the Axel Carlson Artificial Reef off Bay Head, New Jersey. I was diving a 95’ long tug named the Joan LaRie III. I did not use any lights so the video was done in available light. The water had a green cast to it because that’s how our water is.
My first thought was that I was very happy that I bought the LCD back. It allowed me to see exactly what I was shooting. I have seen many videos where people mount the camera to a helmet and let it run throughout the dive. That is okay as long as they edit the video. I have seen too many videos that make me seasick watching them.
As I stated earlier, I bought my housing for the GoPro from Backscatter so that I could purchase their flip up Magic-Filter. I use a blue water Magic-Filter in the tropics and a green water Magic-Filter in New Jersey although to successfully use it in New Jersey, a tripod is a must. To my disappointment, I found that they only make the flip up system for use in blue water which is found in tropical locations. Apparently, the 2-stop light loss through a green water filter would cause the resulting video to be too dark. So now I have to rethink my direction.
One thought is to use the modeling lights from my twin Ikelite DS-125 strobes to light the video when I get close to a subject. I am going to try that the next time that I am out.
This is a back view of the housing with the camera mounted. Easy to use and easy to remove. On my first dive with the setup, I shot still images first. The video camera did not interfere with that process at all. After making a tour of the tug and shooting stills. I turned on the video camera and made another tour of the tug. I found that the housing added stability to the video system. I think that there would have been a lot more shake if I was hand holding the GoPro.
I did some minor editing to the footage and produced a video that was just short of eight minutes long. I used Cyberlink PowerDirector 10 to do my editing. I liked that when I was finished, I could produce and upload the video directly to UTube.
If you would like to see the finished video, click here. I have some other projects in mind for the GoPro. I purchased an extendable aluminum pole with a detachable end (squeegee) from Lowes. I removed the squeegee and mounted a ball head to the detachable end. I can now mount the GoPro to the extendable pole and lower it into the water to shoot underwater video from the surface. One place where I think that this might be interesting is in parts of Barnegat Bay in New Jersey that are infested with sea nettles. These jellyfish are making it impossible to swim in the bay. The initial problem that I have run into is the terrible visibility in the bay. I am going to keep trying and hope for some good results. Lowering the video camera in with a pole means that you have little control over what you are shooting.
I have tried my GoPro on a pole and found that using it from a drifting boat in the bay presents problems as the bottom rushes by during a drift and keeping the camera in position to get an useable video is tough. I have since made some other modifications.
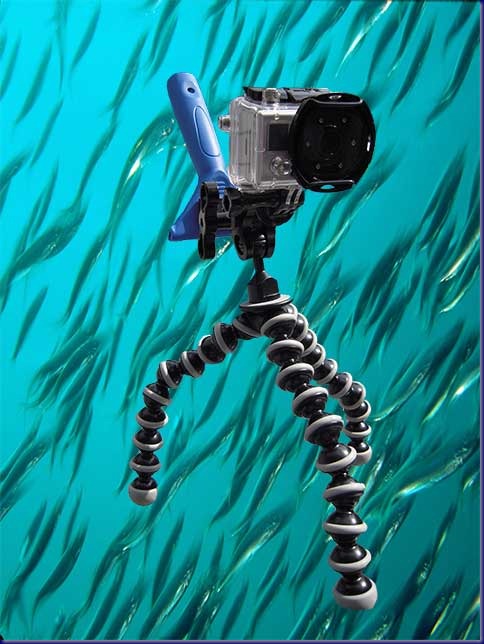
I have added a gorillapod to my pole system and we anchor the boat before placing the camera on the bottom. The gorillapod holds the camera steady and that solves one of my problems. There still is the problem of getting good video in less-than-ideal visibility.
In one test, we anchored near one of the Sedge Islands near Barnegat Inlet. The tide was coming in at a pretty good pace. The video looks like a sandstorm in the desert. I have posted a small sample below. The good thing is that the bottom stays in good focus because of the gorillapod.
I left out the telescoping handle in the photo at left. The plastic part that is attached to the gorillapod is a window squeegee. I removed the squeegee and bolted a ball end to the plastic end.
I was planning on posting this sooner but I have now had a chance to use it some more and would like to add those thoughts. If you are going to shoot underwater and not wear the camera on your helmet or strap it to your chest, the LCD monitor is worth every penny. I found that framing a shot, especially as you get closer to a subject, is a snap with the LCD monitor. Not so without it. I also found out that in bright sunlight, the LCD monitor can be difficult to see. I suppose somewhere down the line someone may make a hood for the LCD back but looking today, I did not see one. My pole attachment works well but it is difficult to place the camera in low visibility situations.
Wes Dalzell and I have been trying to get video of the oyster reef place by Reclam the Bay but it has been an ordeal at best. I used my gorillapod but because of tidal currents and boat wakes, I tend to push down on the pole which causes the gorillapod legs to collapse and before I know it, I am shooting video of the sand. This is definitely a work in progress.
Bottom line: I am extremely happy with the GoPro Hero2 and it has added more depth to my underwater excursions. On land, I would probably opt for a video camera with a zoom lens as I don’t always want to shoot extremely wide angles on land. The saga continues.
© 2012, Herb Segars. All rights reserved.

